Onboarding and Setup
BioSleeve and Digital Mirror Quick Start
How-To
Get Started with the BioSleeve
1. Download the Digital Mirror App on your iPad by clicking on the link provided by Cipher Skin.

2. To complete the download, follow the instructions given on the TestFlight page.
How to charge the BioSleeve
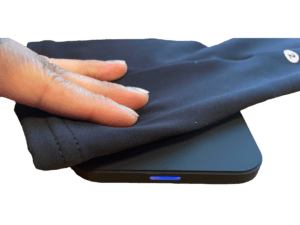
- Connect your charging pad to an electrical outlet.
- Set one sleeve on the pad so the lightning-bolt symbol faces down directly on the pad.
- When the blue LED is illuminated as solid (not blinking), this indicates proper charging.
- Charge the BioSleeve for 60 minutes to reach maximum battery power.
- While charging, a red and blue light in the interior of the sleeve will be visible.
How to put on the BioSleeve
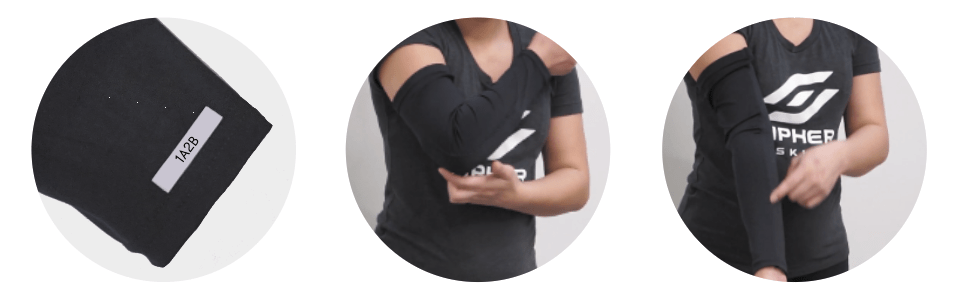
- Find the seam on your BioSleeve
- Rotate your BioSleeve so that the seam is facing up
- Find the larger opening of the BioSleeve
- Insert your arm into the larger opening of the BioSleeve so that the seam will run along the middle of the inside of the arm, along the wrist, the inner portion of the elbow, and the bicep.
- Pull the BioSleeve until the tip of your elbow is aligned with the center of the elbow cup on the inside of the BioSleeve
How to connect the Digital Mirror to the BioSleeve
- If this is your first time using the Digital Mirror, an iOS notification will request permission to use Bluetooth. Select “OK.” In addition, a Bluetooth-pairing request will prompt you to “Pair” or “Cancel” the new device “1A2B.” Select “Pair.” When connecting both sleeves, be sure to pair both devices.
- Sign in to your Digital Mirror account.
- Select “Connect” from the hamburger menu (three horizonal lines) on the top right.
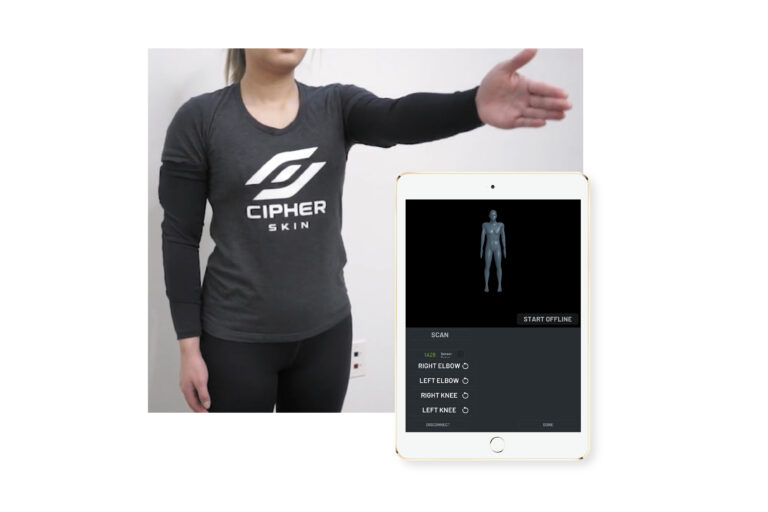
- Next, select “Scan” to search for nearby devices.
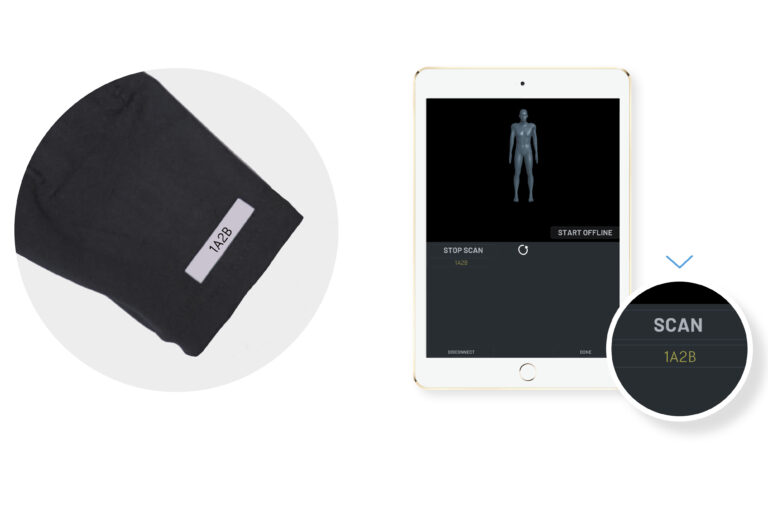
Look at the wrists of each of your BioSleeves to find the 4-digit alphanumeric serial number on each sleeve. This number will coincide with the 4-digit number listed that you will see on the Digital Mirror.
- For example, the alphanumeric code printed on the wrist of the right sleeve
may have the code “1A2B,” and the wrist of your left sleeve may have
“3C4D” printed. The alphanumeric codes you see listed on the screen of
the Digital Mirror will appear as “1A2B” (right arm sleeve) and “3C4D”
(left arm sleeve). Both will be listed in yellow on the screen of the Digital Mirror.
This means that the Digital Mirror has identified both of your sleeves.
- For example, the alphanumeric code printed on the wrist of the right sleeve
Tap one alphanumeric (1A2B) code at a time. When you have selected the first code, you will see a “+” symbol appear. Select “Connect” to connect the sleeve.
When the sleeve is connected, the alphanumeric code, starting with the prefix of BGX, will turn from yellow to green, letting you know that the sleeve is connected.
Repeat this process with the second sleeve.
When both alphanumeric codes are green, you have successfully connected your BioSleeves.
At this point, you should be able to see your Cipher Skin avatar! Your avatar will follow your every motion as long as you are in front of the Digital Mirror. The next step is to assign the BioSleeves to the arms of your avatar.
How to assign the BioSleeve to an arm
- Once your BioSleeves are connected to the Digital Mirror, a menu will display with a list of joints on the body.
- Assume a standing position. You will first assign the right BioSleeve to your right arm.
- Match the numeric code printed on your right wrist with the same code in green listed on the screen and select it.
- You will see a menu displaying a list of right and left elbows and right and left knees. Select “Right Elbow”
- You will see a notification on the screen instructing you to “Assign Right Elbow” followed by instructions to copy the motions of the avatar.
- Next, you will complete certain movements to calibrate the BioSleeve with the Digital Mirror.
- Hold your right arm at your side. Face your palm toward your thigh with your fingers straight and pointed down toward the ground.
- When prompted, lift your right arm directly in front (keeping your arm straight) until your arm is positioned at a 90-degree angle from your body with your palm facing toward your left.
- You will see a notification letting you know that your BioSleeve is now assigned to your right arm. When you move your arm, your avatar’s arm will copy its movements.
Now assign your left BioSleeve to your left arm by repeating steps 4 through 9.
When your avatar is mirroring the movements of your left arm, select “Done”
If the avatar does not mirror the motion of either arm, reassign the BioSleeve(s) by repeating the steps above.
Using your BioSleeves with the Digital Mirror
- Put a BioSleeve on one or both arms.
- Login to your Digital Mirror account. Each login requires you to enter a two-factor authentication code sent to your mobile device.
- Select “Connect” and complete the connection process.
- Next, assign your sleeves to the appropriate limbs.
- Go to the menu on your screen and select “Position” Determine which position your exercise requires. This can include sitting, standing, or supine (lying down
on the back). - Perform your necessary exercises. When you are finished, you may log out and remove your sleeves. When sleeves are not in use, they will go into low-power mode.
Features and Capabilities
Main Menu
- When Mirror Live mode is activated, you can view your avatar as it follows your movements live and in real time.
- When in Test mode, you can access the Range of Motion Tests included in the Digital Mirror. Select a test to learn what it evaluates and to perform it. After completing a test, choose “Save” to store the exercise.
- Replay allows you to view previously recorded sessions.
When using the record function, you can record your movement and store associated data for future playback and evaluation. Recording can take place in either the Mirror Live mode or when selecting “Save” when in Test Mode. However, you cannot record while in Replay mode.
Positions that can be selected are sitting, standing, and supine (lying down on your back).
The camera feature enables videoconferencing and allows a professional, such as a physical therapist or trainer, to observe your exercises.
This menu item displays the battery life of the BioSleeves when they are connected to the Digital Mirror.
Settings Menu
Note: Floor, Furniture, Calib Status, and Torso are not currently available features.
- Enables a floor to be displayed in
the space of the avatar.
- Allows furniture to be displayed.
- View the status of calibrated (connected and assigned) sleeves.
Enables torso movement.
- Select “Connect” to load the calibration screen and connect the BioSleeves to the Digital Mirror.
- Select “Logout” to exit the Digital Mirror
Metrics display motion metrics and biometrics in the cards below the avatar.
- This feature increases or decreases the size of your avatar and is located on the left-hand side of the avatar.